

Using a LCD, electronic assembly
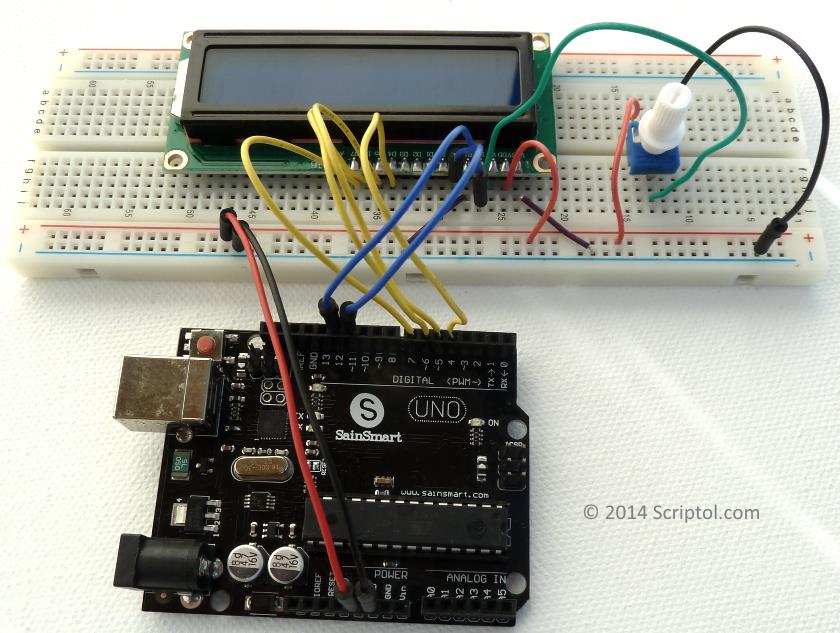
You are beginning in electronics. Why not let the whole world to know it? To do this we will see how to display the message "Hello World!" on an LCD screen connected to an Arduino, or any compatible model. In my demo I use an SainSmart Arduino compatible card and a screen provided in the same kit which has the advantage of displaying the names of the pins, while for others you will have to count the legs of the animal, and there are many ...
The assembly that we will achieve will connect the LCD to the Arduino, and we add a potentiometer to adjust the contrast. The transfer data by packets of bits is managed by the LiquidCrystal library or LCD.js, so all you have to do is calling a function when you want to display something...
The LCD screen
Before you begin, it is necessary to learn what each pin of the screen mean, to be able to connect it where it is needed without blowing something.
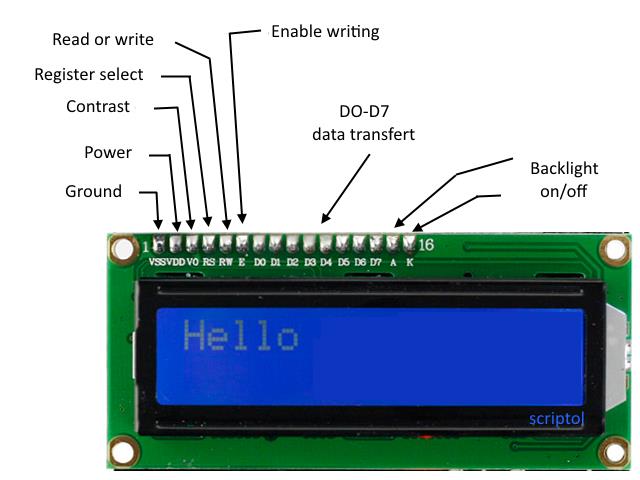
| Pin | Label | Acronym | Task |
|---|---|---|---|
| 1 | Vss | Voltage Source | Linked to the ground. |
| 2 | Vdd | Voltage Drain | Linked to 5 volts. |
| 3 | Vo | Voltage cOntrast (c was already used) |
Adjusts the contrast, through a potentiometer or by program. |
| 4 | RS | Register Select | Selecting what register to send codes (high=data, low=instruction). |
| 5 | RW | Read Write | Selecting read or write (high=read, low=write). |
| 6 | E | Enable | Enable to write in registers of the LCD. |
| 7-10 | D0 à D3 | Data 0 to 3 | Add 4 more bits to send 8 bits at once. |
| 11-14 | D4 à D7 | Data 4 to 7 | Send 4 bits of data in parallel. |
| 15 | A | Anode for backlight | A and K are used to adjust backlight or turn it off. |
| 16 | K | Cathode for backlight | Linked to ground. |
The demonstration uses four bits to transfer data, the library will automatically recognize it because it is initialized with four pins. If we wanted a transfer of 8 bits, we would have given the names of eight pins.
Two more pins are assigned: one for RS to indicate whether it is an instruction or data, and the second for Enable, to enable writing on the screen.
It is also possible to add a port to choose between reading and writing, but we will omit it for now and until we use a touch screen...
Assembly
You need for these components :
- LCD screen.
- Potentiometer.
- Jumper wires.
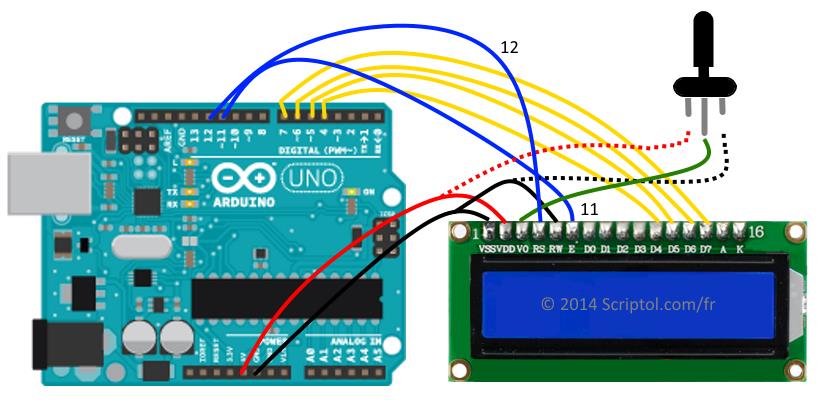
How pins are linked:
- VSS pin is linked to the ground (Gnd).
- VDD pin is linked to 5v.
- RS is linked to digital pin 12.
- RW is linked to Gnd, a mean to assign a low value and set the write mode.
- E to digital pin 11.
- V0 to the data pin of the potentiometer, at the middle.
- The left pin behind the data pin of the potentiometer is linked to 5v.
- The other to Gnd.
- Pins D4 to D7 of the LCD are linked to digital pins 4 to 7 of the Arduino.
The code
C program:
#include <LiquidCrystal.h>

  // initialisation, pins are assigned to RS, E and D4 to D7
LiquidCrystal lcd(12, 11, 4, 5, 6, 7);

void setup() {
    // set the number of columns (16) and rows (2)
  lcd.begin(16, 2);
    // display a message
  lcd.print("Hello World!");
    // move the the second row and display another text
  lcd.setCursor(0, 1);
  lcd.print("Hello again!");
}

void loop() {
}
You can load this code in the IDE of the Arduino and run it by CTRL-U.
Or JavaScript program:
var five = require("johnny-five");
var board = new five.Board();

console.log("Starting...");

board.on("ready", function() {

   // Digital pins are assigned to LCD pins : RS  EN  DB4 DB5 DB6 DB7
   var lcd = new five.LCD(  { pins: [12, 11, 4, 5, 6, 7]  });
   lcd.on("ready", function() {
    lcd.clear();
    lcd.setCursor(0, 0);             // first column, first row
    lcd.print("Hello World!");
    lcd.setCursor(0, 1);             // second row
    lcd.print("Hello again!");
  });
});
The program is launched at command line with : node lcd.js
Troubleshooting
Nothing appear on the screen
LCDs are rather reluctant when asked to display something. If you are in a well-lit area you will struggle to distinguish the text, try a dark place.
Use the pot to adjust the brightness of the screen. But do not turn it completely, too much contrast is as bad as no contrast at all.
Nothing yet
Make sure that each wire is in place by comparing the photo with your assembly. Especially make sure that RS is connected to port 12 and E to port 11.
The JavaScript code does not work
If the C code works and not the JS code, it is not a problem of assembly. Have you downloaded Firmata in the microcontroller? The process is described in an article on Nodebot.
Extending the assembly
It would be also possible to connect a digital port to RW and add a parameter to the initialization:
LiquidCrystal lcd(rs, rw, e, d4, d5, d6, d7);
We must then add a statement to set the value to be sent to the rw port.
But this is unnecessary with a simple 1602LCD like ours where we can just write.