

Advanced Explorer Manual
Installing and using the universal file manager made in JavaScript and HTML 5.
Advanced Explorer is a local application built with the standards of the Web. Technically it is a Web page that interacts with the file system through a Node.js server launched by Electron.
To launch AE, click on its icon, or from the command line enter the Advanced-Explorer directory and type:
electron .
In both cases it starts the server and then the browser with AE's interface as start page.
Installation
Extract the contents of the archive. A directory named Advanced-Explorer-Master is created. Rename it Advanced-Explorer.
Install Electron:
npm install -g electron
Add a new icon on your desktop (by right clicking the mouse and then New -> Shortcut. In the target field type:
c:\Electron\electron c:\Advanced-explorer\
In the starting directory field type:
c:\Advanced-explorer\
Using the interface
The interface consists of two panels, each containing a list of files and directories. The left panel is the source panel, the right panel the target. When you make a copy it is always from left to right (in order to avoid possible confusion). Panels can be exchanged for copying in reverse directories.
Functions between panels
The interface comprises an upper row of icons that control operations between the source and the target panels.
![]() Swaps the left and right panels.
Swaps the left and right panels.
![]() Make the left panel become also the right panel. Actually they displays the same directory.
Make the left panel become also the right panel. Actually they displays the same directory.
![]() Compare the content of the two directories and select on the left, missing or updated entries.
Compare the content of the two directories and select on the left, missing or updated entries.
![]() Copy the list of selected files and directories in the directory of the right panel. The fact that a directory is selected in the right panel has no effect.
Copy the list of selected files and directories in the directory of the right panel. The fact that a directory is selected in the right panel has no effect.
![]() Copy a file or directory with a new name.
Copy a file or directory with a new name.
![]() Synchronizes the contents of the directory in the source window with the directory in the target window on the right. Opens a command panel.
Synchronizes the contents of the directory in the source window with the directory in the target window on the right. Opens a command panel.
![]() Creates a zip archive containing the files and directories selected in the source panel. The archive will be stored in the right panel.
Creates a zip archive containing the files and directories selected in the source panel. The archive will be stored in the right panel.
![]() Opens the editor. It may or may not contain a file. If there is a file, the icon will change and the image will contain lines. Click the icon again to quit the editor and return to the file manager.
Opens the editor. It may or may not contain a file. If there is a file, the icon will change and the image will contain lines. Click the icon again to quit the editor and return to the file manager.
![]() Opens the window of configuration of Advanced Explorer. To return to the lists, click on this icon again. Selected options are only kept for further sessions if you click on the save button.
Opens the window of configuration of Advanced Explorer. To return to the lists, click on this icon again. Selected options are only kept for further sessions if you click on the save button.
![]() Opens the help page (this manual) in a new window.
Opens the help page (this manual) in a new window.
![]() Closes Advanced Explorer and also closes the server. If you close the window or just the browser tab, Advanced Explorer is closed, but the server is still running. In addition, by clicking on this icon, the current directories of the two panels are saved for the next session which is not the case if you close the tab directly.
Closes Advanced Explorer and also closes the server. If you close the window or just the browser tab, Advanced Explorer is closed, but the server is still running. In addition, by clicking on this icon, the current directories of the two panels are saved for the next session which is not the case if you close the tab directly.
Actions local to a panel
Each panel also has a row of icons corresponding to the functions carried out in the list that appears here.
![]() Refreshes the list. This removes the selections and returns to the top of the list. If an archive is open, it closes the archive and displays the directory that contains it.
Refreshes the list. This removes the selections and returns to the top of the list. If an archive is open, it closes the archive and displays the directory that contains it.
![]() Backs to the root directory. On Windows it returns to the root of the current drive.
Backs to the root directory. On Windows it returns to the root of the current drive.
![]() Backs to the directory containing the currently displayed one. When the directory is contained within another, the first element of the list is a directory whose name is "..". You can also click on this entry, the effect is the same.
Backs to the directory containing the currently displayed one. When the directory is contained within another, the first element of the list is a directory whose name is "..". You can also click on this entry, the effect is the same.
![]() Delete the list of selected files or directories. The user receives a confirmation request, but at the same time, the list is displayed in red and crossed out.
Delete the list of selected files or directories. The user receives a confirmation request, but at the same time, the list is displayed in red and crossed out.
![]() Open the box of extensions. Each program in the box knows the current directory and which files are selected.
Open the box of extensions. Each program in the box knows the current directory and which files are selected.
Fields of paths
At top of each panel is a text field containing the current path. You can enter here directly a path to open. On Windows, to change the drive, you type the name of the drive in this field. For example:
d:/
To display the root of the storage unit with the letter D. The interface is flexible and can type d :/ or: \ or d:
List sorted by date
When you click with the right mouse button on the path field, a context menu appears that allows you to choose between sorting by date, by file size or by name.
Creating a subdirectory
Type the name of the subdirectory at the tail of the current path and press ENTER. If the subdir already exists, the program open it, else it asks you if you want to create it.
Images
When a double click is made on a jpg, png or gif file, the image is displayed in the right panel. Clicking on the right panel will then display the image in a new window, in larger size.
In the case of a JPEG file, the EXIF data is also displayed, as long as it has been stored in the file, which is actually rare, but it is normally the case for images made with your own camera or smartphone.
The data displayed are: Camera model, aperture, 35mm equivalent focal length, shutter speed, ISO sensitivity, and shooting mode. Some of this data may be missing.
Bookmark and recents
To put a directory in bookmarks, click on the star. The list of bookmarks can be viewed by hovering the mouse over the computer icon.
When the mouse moves over a name, a cross appears to the left. Click on the cross to delete the bookmark. Click on the path to open the directory.
Below the list of favorites, separated by a line is the list of directories recently used. A directory is automatically added when a document is opened in this directory. You can not delete them manually (except by editing the configuration file). Erasure is automatic when the threshold of 25 bookmarks and recents is reached.
Directory synchronization
Synchronization copies to the target directory files and subdirectories that are in the source and not in the target, and those whose last modified date is more recent.
It is also possible to select a list of files and folders to synchronize. If this list contains directories, they will not sync if the recursive option is not checked.
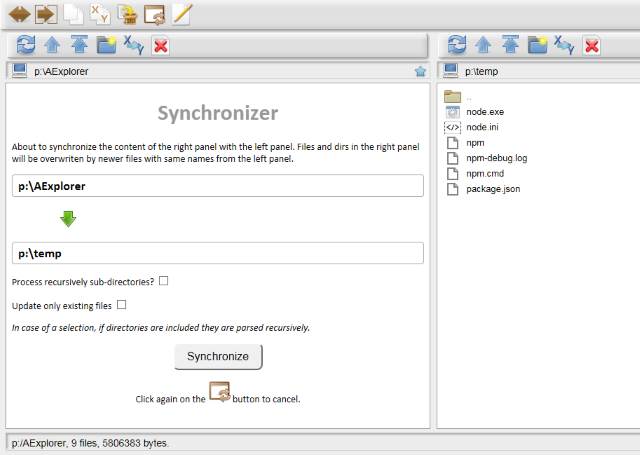
Clicking on the Sync icon brings up a control panel. Two options are available:
- Recursive. The contents of subdirectories is also synchronized. You must check this box, the default operation is not recursive.
- Update only. Only files and directories that are already in the target directory are updated.
To cancel or return to the file list, click the same icon that displays the synchronization panel.
Using the keyboard
Out of the editor and input fields, the program recognizes the following keys:
- Enter
- Has the same effect as double clicking on a file name or directory.
- ctrl-c
- Copy the file(s) selected in the left panel to directory in the right panel.
- ctrl-u
- Extracts a file or list of files or directories selected in the contents of an archive.
Also works to extract an entire archive selected in a file list. In this case the options Keep Path (keep directories) and Overwrite (replace) are always true and choices in the option panel ignored. - ctrl-i
- Provides information on the file or folder. If it is a directory, gives the number of file contents and the disk space they occupy (regardless of the cluster size).
- Suppr
- Deletes a file, directory, or selection. As with the icon, the name is crossed out and a dialog box requests confirmation.
- Cursor
- The up and down cursor keys group replaces a click on a file name. With the ctrl or shift keys, they also select a group of files.
The left arrow goes back in the directory tree.
In the editor, ctrl-s save the file being edited.
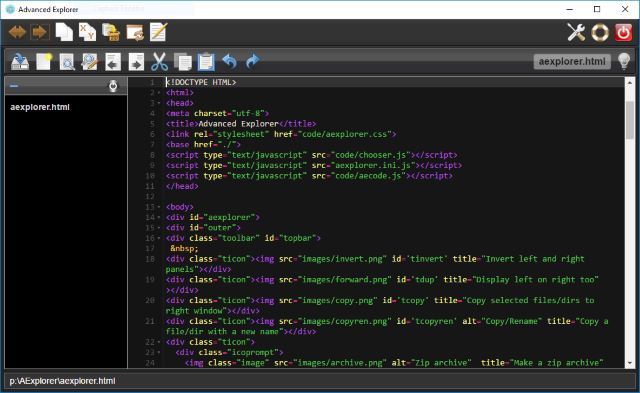
The editor
Based on the Ace JavaScript editor, this complete tool provides syntax highlighting for the most common languages.
Customizing the editor
Switching themes may be be done from the setup panel. You can enter for example Dreaweaver for a white background or Chaos for a black background. Click on the Apply button to update the setup.
Themes available are stored in the src-min-noconflict directory, with the prefix "theme-" that should not be included here.
You can choose a theme from the Ace kitchen sink.
Needless to configure the langage, the language is detected when a source is loaded from the extension of the file. To add another language, put the configuration file in the src-min-noconflict directory with the prefix "mode-".
Then search in the aecode.js file (in the directory Aexplorer) for the languageExt array. Extend the list by adding your extension and language name without the prefix, like the other pairs already in the list.
More infos: see the list of questions and answers.
© 2012-2021 Denis Sureau & Scriptol.com