

SQL Tutorial - First Program in PHP and MySQL
Example: making a demo program that fully manages a small database.
We will so:
- Initialize the system.
- Create a new database.
- Create a table in the database.
- Add items.
- Read an article.
- Delete an item.
- Close the connection.
Initialize the system
On a shared hosting
Your administering interface should allows you to create a database automatically. It provides you with the following information:
Host: something like mysql-5 - 1
Database name: a name you chose
Username: same name as the database.
Password: for user and database.
And to connect to the server, use a command of the form:
$connection = mysqli_connect('mysql5-1', 'user', 'pass')The first parameter is the name of the server.
Local command line:
Enter the directory mysql/bin (which may be contained in XAMPP or other such local server).
mysqld-nt -u user -h server -p nameOr a similar executable came according to your configuration.
With a local server (XAMPP, Easyphp)
Simply connect with the username root.
$connection = mysqli_connect('localhost', 'root');This user does not
need a password.
The connection is
a preamble for the creation of a database and is a prerequisite for any operation
on this database.
For another user than root, a password is required, the command will then have the form for a local server:
$connection = mysqli_connect('localhost', 'root', 'pass');Creating a database
In PHP the mysql_query
function is used to send the CREATE DATABASE command to the server, followed
by the name that you want to give to the database.
So, with a command
like this:
$command = 'CREATE DATABASE mybase';
$results = mysqli_query($connection, $command);
The variable $connection is assigned by the command of the preceding paragraph connection to the database.
PhpMyAdmin
runs from the menu on your local server or from the administering panel of
your remote hosting, you must now have the mybase name in the list
of databases.
You can ignore the
other bases which could have already been generated by the system.
Selecting a database
The server may offer several databases, so after connection to the server it is required to select a base, what is done with this command:
mysqli_select_db($connection, 'mybase'); By default this is the last open base that is used.
Creating a table
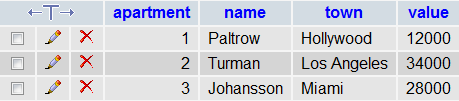
We want to run a
real estate agency, and therefore we have a list of apartments in different
towns, and for each one a owner and an address as well as the real estate
value.
The list of lines,
there are the apartments and in the columns will be set for each one these
data: id, name, address, value.
| Apartment | Name | Town | Value |
|---|---|---|---|
| 1 | Paltrow | Hollywood | 12.000 |
| 2 | Turman | Los Angeles | 34.000 |
| 3 | Johansson | Miami | 28.000 |
The creation of the
new table is done with the CREATE TABLE command with as a parameter the name
of columns (in this case apartment, name, city, value) followed by the data
format.
About the format we
will use an integer for the apartment code and for the value.
For names and cities, strings of fixed size are used whick will make access
faster, but we would have rather used a text of varying size for an article
such as a blog post.
It will be as the primary key the apartment code.
This gives the following SQL command for the houses table:
CREATE TABLE houses (apartment INTEGER(3),  name CHAR(30),  town CHAR(50),
    value INTEGER(9), PRIMARY KEY(apartment))
The definition of types has in parentheses the macium number of characters or digits. A chain of at most 30 characters is so written CHAR (30).
To pass this command in PHP the mysql_query function is used again:
$command="CREATE TABLE(etc...)";
$result = mysqli_query($connection, $command);
Now run phpMyAdmin
and look in the mybase database.
In the menu on the
left, houses appears under the name of the database, click on it to
see the details of fields:
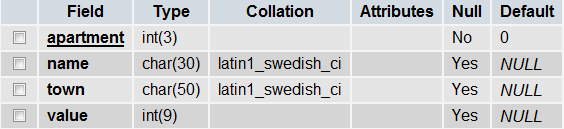
Note that the primary key is underlined and that this field can not be null because it's a primary key.
Insert items into a table
The INSERT INTO command allows you to add lines to the table. The format is as follows:
INSERT INTO tablename (...columns...) VALUES(...values...) Values match the
columns.
For our example,
the first row of the table can be added with the command:
INSERT INTO houses(apartment, name, town, value)
  VALUES(1, 'Paltrow', 'Hollywood', 12000)
Note that text fields are enclosed in quotation marks as opposed to numbers.
Once the three lines added, return to phpMyAdmin, click on the table name and then on browse.
Read the content of an article in the database
The SELECT function is the most elaborate in SQL, but in this introductory chapter we use only the most basic functionality. To read a field in a table, we shall provide a condition, for example, the code of an apartment. A search could be made on other fields of course.
SELECT * FROM tablename WHERE conditionThe mysql_query function in this case returns a resource id, while it returns true when the operation is a success in other cases. If the request fails, it returns false in all cases.
The PHP code will be as follows:
$command="SELECT * FROM houses WHERE apartment = 2";
$result = mysqli_query($connection, $command);
We must then use the resource id assigned to $result to retrieve the row through the mysql_fetch_row PHP function, which returns a table:
mysqli_fetch_row($results)The current transaction must display the contents of a table corresponding to the second row of the table.
Delete an item
This is done with a condition similar to that of reading, and with the DELETE command:
DELETE FROM tablename WHERE conditionIn PHP:
$command = "DELETE FROM houses WHERE apartment = 3";
mysqli_query($connection, $command);
Return again to phpMyAdmin and the command browse to verify the third line has been removed.
Close connection
This can be done automatically at the end of the script or with a call to the mysql_close function:
mysql_close($connection);Conclusion
To use SQL with PHP, we have used the following functions:
- mysql_connect: connect.
- mysql_select_db: choosing the base.
- mysql_query: pass a command.
- mysql_fetch_row: obtaining a row of the table depending on the resource id.
- mysql_error: awareness of the possible error messages.
- mysql_close: logging out.
The rest is in the syntax of the SQL language.
Sources of the programs
Change the extension to PHP to run scripts. You can also download the sources of the first SQL program.