

Overview of Arduino and working environment
Experiments with Arduino and the Johnny Five framework.
What processor for a robot?
Arduino is a nano computer, microcontroller so-called because it is used primarily to program devices. Yet it is 16 times faster than was the Apple][, a computer used his time to gaming, word processing or managing a small business!
![Arduino vs Apple ][](https://www.scriptol.com/electronics/images/arduino-vs-apple2.jpg)
Other alternatives used in electronics are even most powerful. The Launchpad series of Texas Instruments is 80 times more powerful than the original Apple and has supports to floating point operations. The Raspberry Pi with its GPIO (General Purpose Input Output) ports, is also used for assemblies but is 700 times more powerful, enough to run a browser.
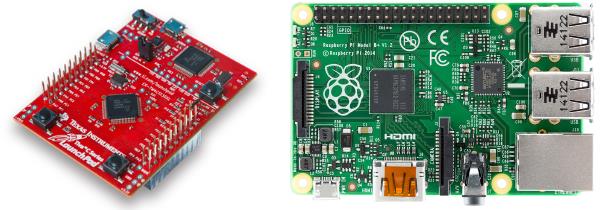
Launchpad of Texas Instrument and Raspberry Pi
We therefore use the Arduino or the smaller version, Arduino Pro to control parts of the robot, and possibly a Launchpad controller for more demanding tasks such as the calculations of the balance of the robot, and finally a Raspberry for managing the general behavior of the robot and serve as supervisor for Arduinos, and also like interface to a remote computer or a mobile device (if the Raspberry is installed in the robot).
An ideal language: JavaScript
To control the electronic components like the robot's behavior, JavaScript is the language we choose, for several reasons ...
- The Arduino IDE and compiler only work with Arduino. JavaScript code can also run from the console with node.js and also on Raspberry and other controllers.
- The event-oriented model is well suited for robots that react to events.
- Portability across different OS so you can develop where you want it.
- Its support in browsers: we can build GUIs interaction easily by treating the robot as a server.
- Many languages compile to JavaScript while maintaining the dynamic side. These include TypeScript, CoffeeScript and Scriptol. You may so use the programming language of your choice.
- It is inevitable that you will want to use a mobile to control the robot remotely. It is easier to interface two JavaScript programs.
- The dynamism of the language allows to build objects in real-time, which can help the robot learning...
- JS objects are serializable and this can enable robots to easily and directly exchange their expertise.
The language once selected, the development environment can be defined ... What we need to start:
- An Arduino starter kit.
- The Arduino IDE.
- Node.js.
- The framework Johnny-Five and Firmata program (it is provided in the IDE).
- A USB hub with switches to disconnect and reconnect the circuit, as it will be done very often.
Create a work environment
All assemblies that we'll add in this section will help you learn how to build robots. It is even likely that you can not build a robot if you do not know what will be shown here.
The work environment is also defined in order to allow you to build a robot.
We'll start with the Arduino IDE and a JavaScript framework, but eventually we will add other tools of human-computer interaction useful in robotics.
Install the necessary software:
- Download the Arduino IDE on the manufacturer's website.
- Connect the Arduino to the computer via USB.
- Select a board.
- Open the Examples menu, then Firmata and then select StandardFirmata to load the driver.
- Update the Arduino by typing CTRL-U.
- Download and install Node.js. The module loading program npm is included.
- Open the console. Install the framework Johnny-Five and the module required:
npm install node-gyp
npm install johnny-five
- Now you can make an assembly, "Hello World! on the LCD screen" for example, and run the corresponding command-line program:
node lcd.js
New assemblies will be presented every day. Check back often on the site ... You can also view the exercises for NodeBot by Anna Gerber.