

Test of the HOT UK05 sound detector
It can be used to reactivate a robot. Test movements in response to a pencil stroke on the table. The light detector which is included in most electronic kits may also accompany it for sound and light sensing.
This component has three pins, one for the 5 volt supply, the second to connect to the ground through the microcontroller and the third at the center to be connected to a digital port. The role of each is marked in large letters on the circuit so one can not go wrong in the assembly (which does not mean it will not happen!).
When a sound is heard nearby, a light comes on, which is convenient to check its operation, and simultaneously is sent a LOW LEVEL digital signal on the output.
We can test the signal value as 1 for silence and 0 when a sound occurs. The indicator lights when the signal 0 is sent.
Parts
Beside the Arduino or a compatible model as that used for the test, as seen in the picture:
- 1 HOT UK05.
- Three male-female wires. You can also use male-male wire with pins, which are included in all kits.
Assembly
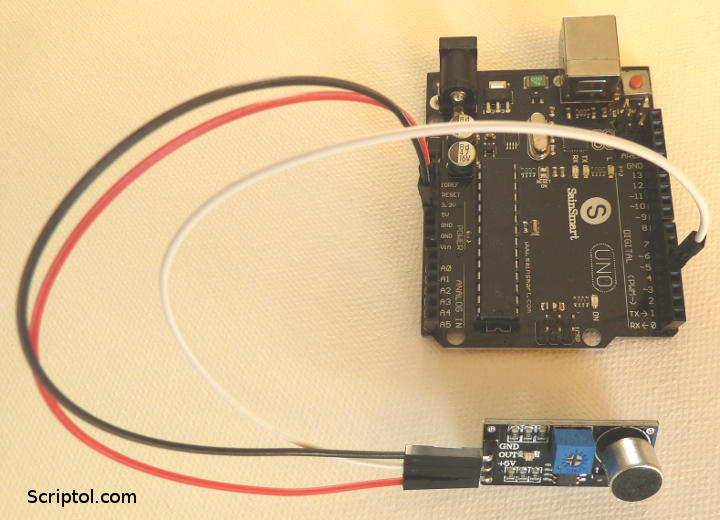
- The black wire connects GND on the sensor to GND on the controller.
- The red wire connects 5V on both cards.
- The white wire connects OUT to the digital 4 pin.
You have to turn the screw on the component until the LED illuminates. We then made a U-turn to the left screw off. In this way the sensor is sensitive to the slightest sound. Just tap on the table with the screwdriver to react.
JavaScript code
var five = require("johnny-five");
var board = new five.Board();

board.on("ready", function() {

    console.log("Arduino ready...")

    this.pinMode(4, five.Pin.INPUT);

    var preval = 1;
    this.digitalRead(4, function(value) {
        if(value == 0 && preval == 1) {
            console.log("Sound...");
        }
        if(value == 1 && preval == 0) {
            console.log("Quiet...")
        }
        preval = value;
    });

});This code does not use any Johnny-Five API object, only the basic input-output functions, so it would be easy to convert it to Arduino code if preferred.
Troubleshooting
The indicator lights up when you make noise, but the program does not display anything: The sensor responds well to sound, but wires are incorrectly connected. Check that the pin connected to white cable on the sensor is connected to the digital pin 4 on the Arduino.
The program displays 1023: You are currently testing an analog, not digital input.
The light goes crazy: You must place yourself in a quiet environment for the sensor works well.
The light is always on or off: The potentiometer on the sensor needs to be adjusted. Turn it with a screwdriver so that it is off but a turn to light.