

JavaScript-Ini, a configuration file for JavaScript
A script to load and save a JSON configuration file, which automatically generates a user interface to configure an app.
The advantage of this script is the developer has only to define the list of options for configuring an application in a JSON file. The script then generates the corresponding user interface in HTML and save user's choices in the JSON file.
- Options are defined in a JSON file. They contain initial values that the user can change.
- The JSON file is loaded into a web page and this script generates a form according to its content.
- The user can change the options from this interactive form.
- Changes are saved in the same JSON file.
The script uses Ajax to save the configuration file, which can be on a local computer or on a server for an online application.
In fact you can choose between:
- Send data to another page or script by the Submit button.
In this case you can remove the inclusion of the Ajax framework - Use Ajax to store data directly to a file.
In this case you can remove the lines generating the form tag.
By default, the demo uses Ajax.
The configuration file and how it is loaded
To load it, it is very simple, just include the .ini file as a JavaScript script:
<script type="text/javascript" src="myapp.ini"></script>
This file contains an array named config which is included in the interface page and therefore may be used by JavaScript code in the page.
Example of configuration file:
var config={
  "Language": {
    "name": "lang",
       "initial": "es",
       "select": [ "en", "fr", "es"]
  },
  "Url": {
    "name": "url",
    "input": "https://www.scriptol.com/",
  },
  "Saving options": {
    "list": [
       {
         "name": "save",
         "label": "Autosave",
         "checkbox": true
       },
       {
         "name": "prompt",
         "label": "Prompt",
         "checkbox": false
       }
     ]
  }
}
This file contains three sample sections: "Language", "Url", "Saving Options". The section names are totally free.
They may contain one form object or more, as it is the case of the third section. You can add as many sections and form objects as necessary in the config array.
A set of reserved words are used by the generator:
- list: to add a list of form objects.
- name: the name and id of a form object.
- label: text to display in front of the object.
- initial: initial value. It can also be assigned directly to the object, it is the case for input, checkbox.
- input: to generate a text input field.
- select: Generates a list of options. We then assigns the list of options as above.
- checkbox: for a checkbox. The true value is assigned for a thicked box, or false otherwise.
The order is important within a section. We must know the name and initial values before generating the form object.
Form generation
We generates fieldset and form tags, and then go through the list of sections:
form +="<fieldset><legend>Configuration</legend>\n";
form +="<form method='POST' action='myapp.php'>\n";
for(group in config)
{
  form += "<p class='group'>" + group + "</p>";
  parseGroup(config[group]);
}
form += "<p><input type='button' onclick='saveIni(\"myapp.ini\")'
         value='Update Configuration'></p>";
form += "</form>";
form += "</fieldset>";
We generated an object of type button to save the configuration Ajax. If you want to send the form data to a script by POST, replace it with the submit button.
For each section is called the parseGroup function for generating form objects:
function parseGroup(innarr)
{
  var initial = '';
  var name = '';
  for(option in innarr)
  {
    switch(option)
    {
      case 'list':
            var garr = innarr[option];
            for(var i = 0; i < garr.length; i++)
            {
              parseGroup(garr[i]);
              form +="<br>";
            }
            break;
      case 'label':
           addLabel(innarr[option]);
           break;
      case 'name':
          name = innarr[option];
          break;
      case 'initial':
           initial = innarr[option];
           break;
      case 'select':
           addSelect(name, initial, innarr[option]);
           break;
      case 'input':
           addInput(name, innarr[option]);
           break;
      case 'checkbox':
           addCheck(name, innarr['checkbox']);
           break;
      default:
           break;
   }
  }
}
Then, for each tag type, a function is called. See the complete script in the demo archive.
This script is used to generate the following interface:
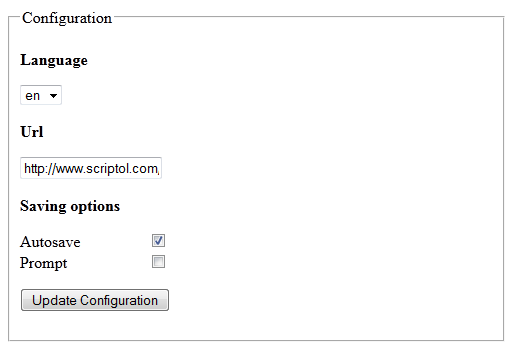
The user, once options selected in the form, click on Update to save the configuration.
Configuration backup
The same algorithm is used to update the config table before saving to an INI file.
Again we parse each section:
function update(config)
{
  for(group in config)
  {
    updateEntry(config[group]);
  }
}
And for each section we access form objects from theirs identifiers. This is what has been assigned to the name attribute in the JSON file.
function updateEntry(innarr)
{
  var initial = '';
  var name = '';
  var element = null;
  for(option in innarr)
  {
    switch(option)
    {
      case 'list':
            var garr = innarr[option];
            for(var i = 0; i < garr.length; i++)
            {
              updateEntry(garr[i]);
            }
            break;
      case 'name':
            name = innarr[option];
            element = document.getElementById(name);
            break;
      case 'initial':
            initial = innarr[option];
            break;
      case 'select':
            var value = element.options[element.selectedIndex].value;
            innarr['initial'] = value;
            break;
      case 'input':
            innarr['input'] = element.value;
            break;
      case 'checkbox':
            innarr['checkbox'] = element.checked;
            break;
      default:
            break;
    }
  }
}
We therefore assign the values given by the user to the attributes of the array, and it depends on the type of form object. Remains to save the array in the configuration file myapp.ini. The saveInit function is associated to the Update button.
function done(content) { alert(content); }
function saveIni(filename)
{
  update(config);
  var data = 'url=' + filename + '&data=var config=' + JSON.stringify(config, null, 4);
  AAWrite('saveconfig.php', data, done);
}
The AAWrite function of the lightweight Ajax framework Anaa is called to run the saveconfig.php script, to which is sent the JSON content. The saveconfig.php script stores this content in the file. Here is this script:
<?php
  $data = $_POST['data'];
  $url  = $_POST['url'];
  $f = fopen($url, 'w');
  fputs($f, $data);
  fclose($f);
  echo "Saved.";
?>
For using JavaScript-Ini for a local application with Node.js, we will instead use WebSocket and include socket.io in the interface page rather then the Anaa framework.
Download the complete Ajax demo
List of files:
- javascript-ini.html: the configuration page.
- javascript-ini.js: script to generate the interface and save options.
- anaa.js: the Ajax framework.
- myapp.ini: the configuration file containing an array.
- saveconfig.php: backup script for the configuration file.

Advanced Explorer makes use of JavaScript INI