

Clipping tutorial for GIMP
Changing the scenery behind a person, animal, or moving an object from one photo to another.
This is done easily by clipping and then copying and pasting.
To do this, the GIMP provides a special tool, the Foreground Select Tool, which is a perfect tool for clipping.
Update: This tutorial was made on Gimp 2.6. With the 2.10 and following versions, the way the tool works is different.
Initial image and final image |
|
 |
 |
1) Load the original image. Here on the left |
|
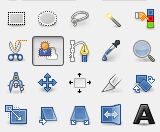
2) Click on the foreground select icon |
|
A dialog box appears. All operations will be performed with this tool. It is not necessary to change the tool until the phase of copying and pasting.
|
|
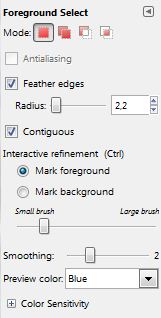
3) Choose the options |
|
Modes of foreground select
Feather edges Effect of blurring the edge to avoid a jagged path. Contiguous Selected either single path around the brush or more selections based on the colors designated by the brush (the brush is used in a second step). Interactive refinement Use for the brush either the background color or the foreground color, to better see the line, depending on the colors of the image. Size of brush: for a more or less fine selection. Smoothing Allows to remove the small holes that can appear in the trimmed image. Preview color Color that will hide the background, blue by default. |
 |
4) Mark the object to be trimmed |
|
When you reach the starting point and you release the mouse, the background turns blue around the selection. The mouse cursor is replaced by that of the brush. Do not change the tool, the second stage begins. |
 |
5) Paint the object to keep |
|
With the brush, draw simples lines on the object to be trimmed. When you release the mouse, the object is narrowly circumscribed. But there may be parts of the object not included in the selection, move the brush over them. |
|
6) Complete and copy |
|
Press ENTER to finish. You are leave the clipping mode. Your object is now isolated on a transparent background. |
|
7) Overlapping on a new decor |
|
To add a new background, load the image of the choosen scenery. Return to the clipped object, select all, copy and paste over the image of the scenery. |
|

Your first step in photo editing is done. GIMP, providing increasingly sophisticated tool, becomes a powerful for graphics and photo editing. The addition of plugins yet complete it as seen with the tool to remove objects on a photo.