

A beating heart
To contradict the sci-fi/horror movies that often picture robots as killing machines, our first robotics part will be a heart, we'll let beat according to the emotions of the robot. We'll start with something simple, and choose ourselves the emotional states from an HTML interface... building a program of emotional reactions is something that will come later!
This is also an opportunity to show how we can communicate with the body of a robot from a control interface built by ourselves, using locally WebSocket.
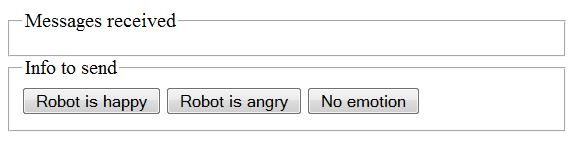
When you click on "Robot is happy" the light flashes blue. "Robot is angry" it flashes red, and the third option, white.
At the same time appears in "Messages received" a message from the script that provides the textual equivalent of the received command and the action it performs.
Parts and software
- A RGB LED.
- 330 ohms resistors x 3.
- Jumper wires.
- An image of paper and cardboard that we realize ourselves.
We also need to install an additional JavaScript Module, socket.io:
npm install socket.io@"~0.8.1"
This is version 0.8 because version 0.9 causes problems in trying to install gyp (we already installed it for Johnny-Five), with a series of endless dependencies. In the future we will try to do without socket.io, but to save time, we proceed at this time with an older version that works.
We use a sheet of cardboard in which we cut the shape of a heart. The image below is printed on a sheet of paper and we use the image of the heart to cut the shape in the cardboard. Then we stick the paper on the cardboard and put it on the robot, over the LED that represents its heart.

Assembly
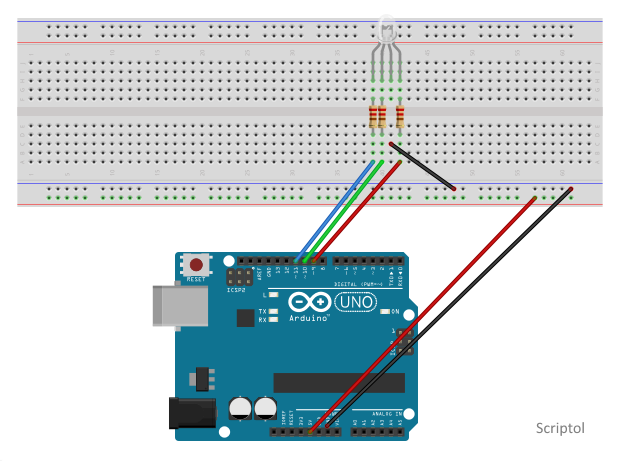
- The shortest pin is connected through a resistance to pin 9. It corresponds to the red color.
- The longest on its left is connected to the ground pin.
- The pin at left of the longer pin is connected to the port 10. This corresponds to the green color.
- The leftmost pin is connected to the port 11 and corresponds to blue.
- The prototype board is connected to 5v and Gnd on the Arduino.
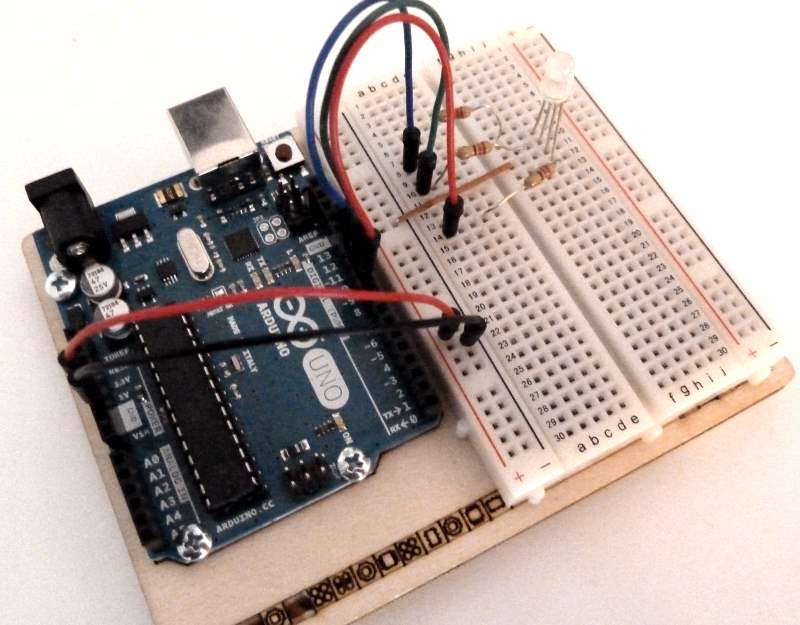 |
Photo of the assembly |
Scripts
Testing the assembly
We first use a simple test script to verify that our assembly works well.
var j5 = require("johnny-five");

var mood="";

j5.Board().on("ready", function() {
  var myLed = new j5.Led.RGB([ 9, 10, 11 ]);

  // LED to blue for a second and a half
  this.wait(500, function() {
    myLed.color("#00ff00");
  });

  // LED to red for a second
  this.wait(2000, function(){
    myLed.color("#ff0000");
  });

  // let flashes red for "angry" emotion
  mood = "angry";
  this.wait(3000, function(){
    var color;
    switch(mood) {
      case "happy":
        color="#00ff00";
        break;
      case "angry":
        color="#ff0000";
        break;
      default:
        color="#ffffff";
    }
    myLed.color(color);
    myLed.strobe(500);
  });

  // 6 seconds after you turn off all
  this.wait(6000, function(){
    myLed.off();
  });

});
You can try to change the code and assign "happy" or "" to the mood variable.
Using a control interface
To communicate with the Arduino via the HTML interface, you open a browser and enter the following URL:
localhost:8100
Firstly you start the script with node:
node heart.js
Then you open the HTML page.
This script is longer than the first one because it also creates a mini local server to send an HTML page to the browser. This page then communicates with the server that sends signals to the Arduino. This is a good way to test an assembly and we will reuse the same principle in the assemblies to come.
var uri="/websocket.html"; // the name of the interface page

var j5 = require("johnny-five");

var myLed;

// the LED flashes blue at first
j5.Board().on("ready", function() {
  myLed = new j5.Led.RGB([ 9, 10, 11 ]);
  myLed.color("#ffffff");
  this.wait(2000, function() {
    myLed.color("#00ff00");
    myLed.strobe(1000);
  });
});

// creating a local server
var fs = require('fs'),
    http = require('http'),
    socket = require("socket.io");

var page = fs.readFileSync(__dirname + uri);

function handler(request, response)
{
  response.write(page);   // page is sent to the browser
  response.end();
}

var app = http.createServer(function(r, s){ handler(r,s); });
app.listen(8100);

var listener = socket.listen(app, { log: false });

console.log("Waiting...")

// It is here that the script interpret commands from the HTML interface
// and send commands to the Arduino
function start(socket)
{
  socket.emit('notification', 'Server online via websocket...');
  socket.on('data', function (data) {
    var message;
    var color;
    switch(data)
    {
      case 'happy':
         message="robot happy";
         color="#003399";
         break;
      case 'angry':
         message="robot angry";
         color="#990000";
         break;
      default:
         message="no emotion";
         color="#ffffff";
         mood='';
    }
    listener.sockets.emit('notification', "Data received, " +message);

    myLed.color(color);
    myLed.strobe(1000);

  });
}

listener.sockets.on('connection', function (socket) { start(socket);} );
The HTML page contains a form to choose an emotion:
<form name="form1" method="post" action="">
  <input type="button"  value="Robot is happy" onClick="callserver('happy')">
  <input type="button"  value="Robot is angry" onClick="callserver('angry')">
  <input type="button"  value="No emotion" onClick="callserver('neutral')">
</form>
And a script to communicate with the robot:
var socket = io.connect();
function notification(content) {
  var x= document.getElementById("storage");
  x.innerHTML = content;
}

socket.on('notification', function(x) {
  notification(x);
});

function callserver(mood) {
  socket.emit('data', mood);
}
The operation of WebSocket with a local script is explained in this article: Getting Started with WebSocket and Node.js.
Source files are in a zip archive.
- heartest.js
- heart.js
- websocket.html
Troubleshooting
The LED fails to light
This often happens with RGB LED and legs of different lengths, it is difficult to connect the right pin in the right hole! You should have three pins from left to right with increasing size and a smaller matching red color. The longest just before must be connected to ground.
Colors don't match
This can be an exchange of wires or a software problem: the color codes were reversed. Red is given by the two first hexadecimal digits (FF = 255), blue by the following two (not usual) and green by the last two.
Extending the assembly
You can add more emotion. For example, "very happy" or "very angry." To do this you add two options to the form and make the heart beat faster for new emotions with the value of 500 to the strobe method ...
Thereafter may be considered to represent all the emotions of the Plutchik wheel!