Canvas Logo Maker, manual of use
Creating automatically logos in the browser with HTML 5 Canvas.
Compatibility: Firefox 9, Chrome 16, Safari, Edge.
How to save the logo that was created?
With Firefox 10, simply right-click on the logo to display a popup menu that offers to save the image.
On Chrome for now on it is not impossible, an image must be created from the canvas and added to the page to be saved (you can make a capture too).
At the bottom of the interface, click The logo you have designed is a PNG image that appears in the page under the interface panel. To save this picture, click the right mouse button to bring up a menu, then click "Save".
Change the size of the logo
This can be done with the cursor over the canvas or by directly entering the number of pixels. The first slider is the width of the canvas, the second it its height.
Use of color

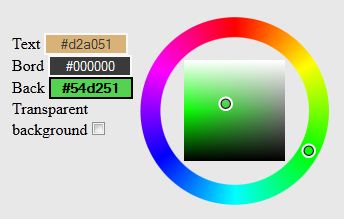
A sample can change both the text color, background of the logo or border of the text, if it is given one. First you click on one of the three input fields on the left:
- Text.
- Background.
- Border.
Then you move the mouse over the circular sample and the inner squared sample to get a nuance. Then click on one of the three input fields to update the corresponding color. When one of the three fields is surrounded by black, and then selected and activated, you can directly change the color of the item by clicking on the sample.
You can also directly enter a hexadecimal color code in the input field.
In this case you must enter 6 hexadecimal digits or 3 digits, possibly preceded by "#", but it is not necessary. In the first case each pair corresponds to the values red, green, blue respectively. In the second case each digit is doubled to form a pair and thus a component of an RGB color.
Example: 448800 or 480 correspond to the same color.
Font and text position
The text is shifted into the canvas by clicking the buttons or to the position x and y (horizontal and vertical).
A list of fonts is available, including Windows' ones. It can be extended by modifying the source code.
The text size is changed with a slider, like the canvas or by directly typing the number of pixels in the input field.
Adding a shadow
Check the box next to "Shadow" to display a shadow. This can be more or less separated from the text, and more or less diffuse. To do this, enter values in the "Offset" and "Blur" on the same line.
Adding a border
The text can have a border whose thickness is specified in pixels and can be shifted from the text. Default offset values are 0 and the edge is adjusted around the text.
The color of this border can also be defined by clicking the input field "Bord" next to the color swatch.
Adding a picture
When adding an image, it is behind the text. It does not replace the background, but if it is a texture, the image will be over it.
The button selects an image from the local file system. It can then be used in different ways:
The image is displayed as it is, cropped to fit the size of the canvas.
The image is resized to the size of the canvas and serves as a background. It can lose its proportions.
The image is added to the sample of textures and can be used as such.
Using textures
As the colors, textures can be applied to the bottom of the text or logo. Tick the appropriate box and click on a texture.
If you have checked "Transparent background" next to the color samples, the texture is obviously not displayed.
When choosing a texture, this replaces the background color. Conversely, when choosing a background color, it eliminates the texture.
The logo editor
- Canvas Logo Maker.
- Source code. On Google code.
To do list
- Use of fonts from online services.
- Effects of light on the text and background.
- Saving in jpg and gif.
- Saving directly the logo.
- Inclination of the text (requires better support for Canvas by browsers).
Any contribution is welcome ... on Github.
Credits
The software uses the following libraries:
- jQuery.
- Farbtastic Color Picker 1.2 by Steven Wittens.
- Carpe Slider by Tom Hermansson Snickars.
License
Mozilla Public License. GPL compatible. Any modified version must remain under MPL.
http://www.mozilla.org/MPL/1.1/

